Paid search advertising is a powerful way to drive traffic and conversions for your brand.
However, setting up your first campaign can feel overwhelming if you’re new to the game. Even if you’re a PPC pro, it can be hard to keep up with all the changes in the interfaces, making it easy to miss key settings that can make or break performance.
In this guide, you’ll find the essential steps to set up a successful paid search campaign, ensuring you’re equipped with the knowledge to make informed decisions that lead to positive results.
Step 1: Define Your Conversions & Goals
Establishing clear goals and understanding what constitutes a conversion is the foundation of a successful paid search campaign.
This clarity ensures that every aspect of your campaign is aligned with your business objectives.
Identify Your Key Performance Indicators (KPIs)
In order to identify those KPIs, it’s crucial to understand the overarching business objectives. Begin by mapping out your broader business goals.
Ask yourself, “Am I aiming to increase sales, generate leads, boost website traffic, or enhance brand awareness?”
From there, you can define specific KPIs for each objective. Some examples include:
- Sales: Number of transactions, revenue generated.
- Leads: Number of form submissions, phone calls, appointments created.
- Traffic: Click-through rate (CTR), number of sessions.
- Brand Awareness: Impressions, reach.
Set Up Conversion Tracking
Knowing your goals is one thing, but being able to accurately measure them is a completely different ballgame.
Both Google and Microsoft Ads have dedicated conversion tags that can be added to your website for proper tracking.
Additionally, Google Analytics is a popular tool to track conversions.
Choose what conversion tags you need to add to your website and ensure they’re added to the proper pages.
In this example, we’ll use Google Ads.
To set up conversion tracking using a Google Ads tag, click the “+” button on the left-hand side of Google Ads, then choose Conversion action.
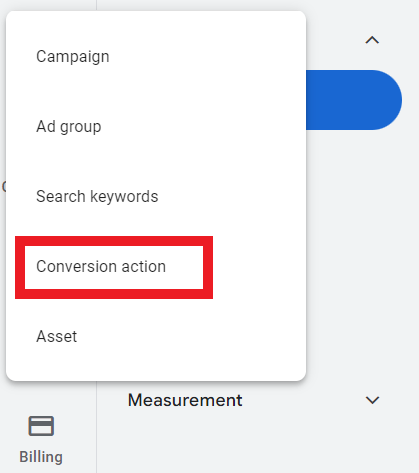 Screenshot from Google Ads, September 2024
You’ll choose from the following conversions to add:
- Website.
- App.
- Phone calls.
- Import (from Google Analytics, third party, etc.).
After choosing, Google Ads can scan your website to recommend conversions to add, or you have the option to create a conversion manually:
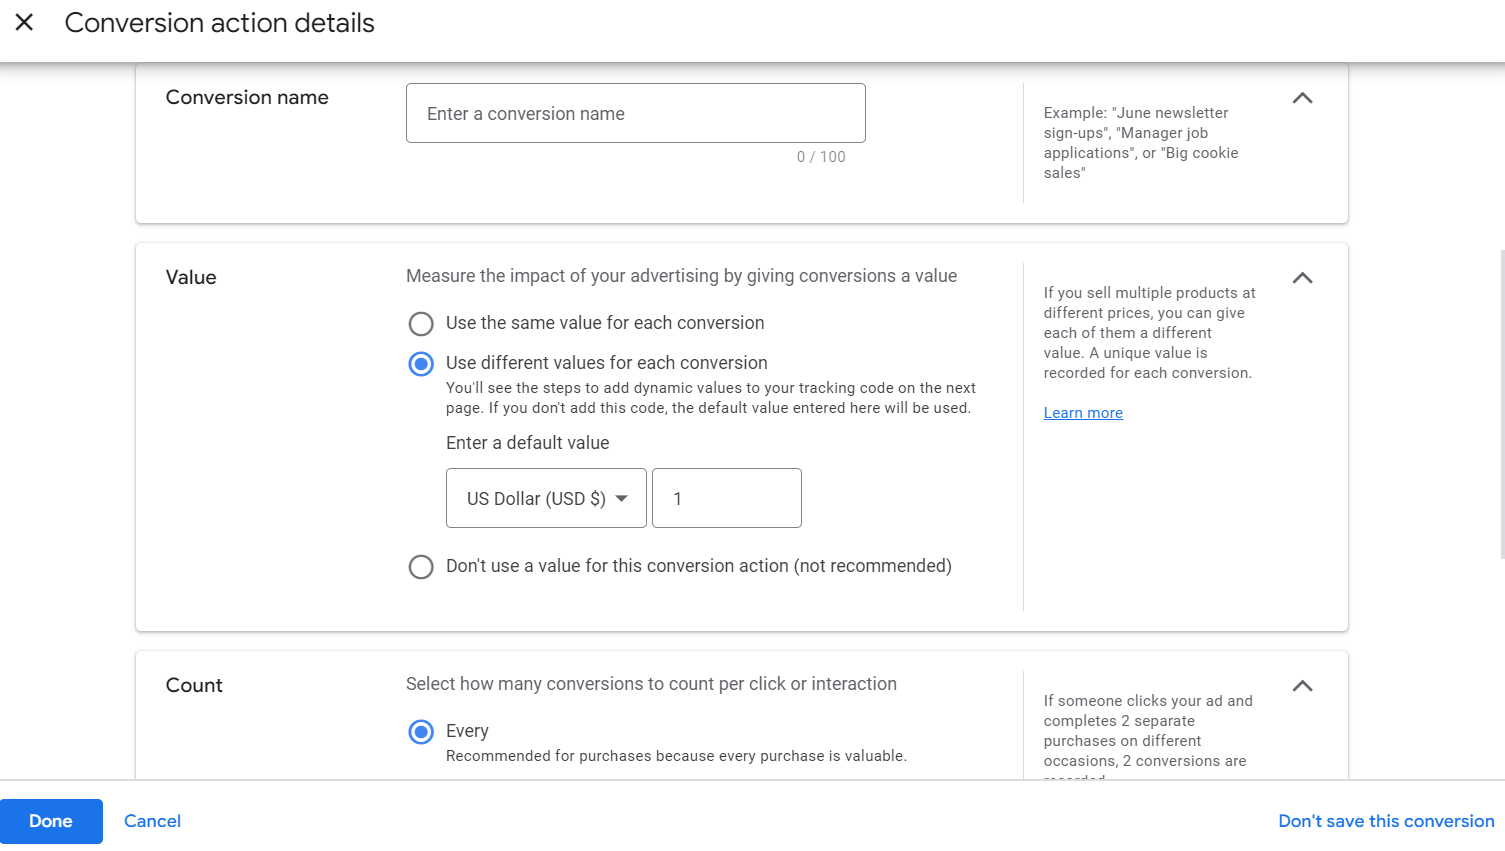 Screenshot from Google Ads, September 2024
During this step, it’s essential to assign value(s) to conversions being created, as well as the proper attribution model that best represents your customer journey.
Most PPC campaigns are now using the data-driven model attribution, as opposed to a more traditional “last click” attribution model. Data-driven attribution is especially helpful for more top-of-funnel campaigns like YouTube or Demand Gen campaign types.
After the conversion has been created, Google provides the necessary code and instructions to add to the website.
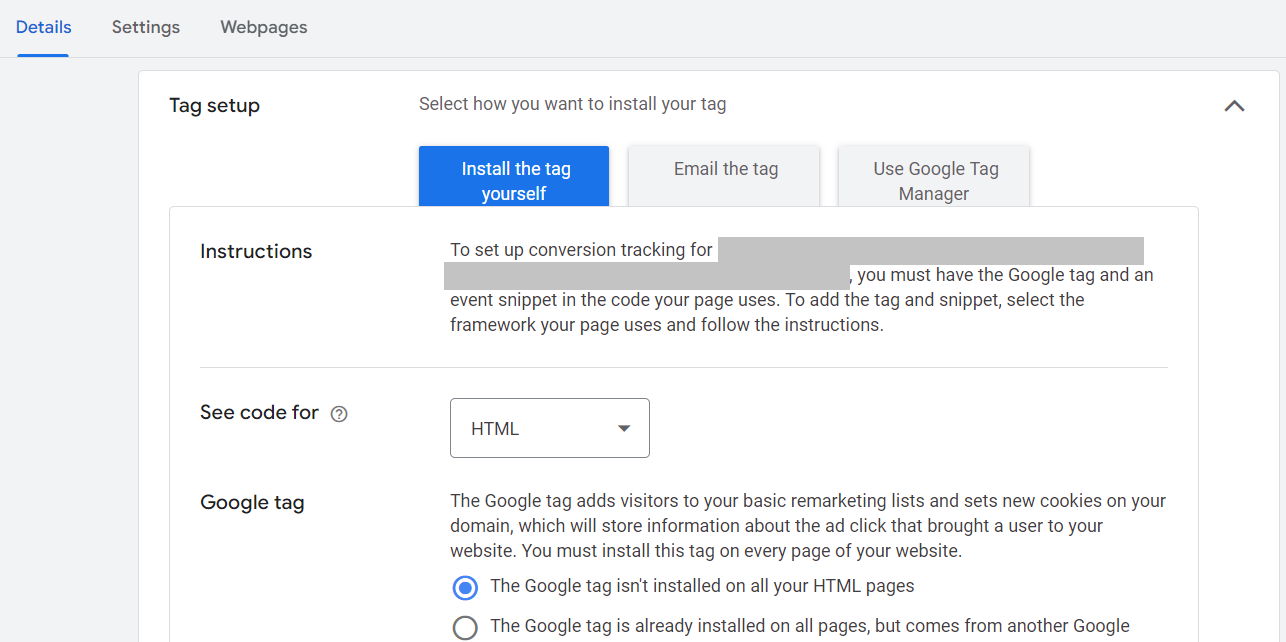 Screenshot from Google Ads, September 2024
Enable Auto-Tagging
Setting up auto-tagging from the get-go eliminates the need to append UTM parameters to each individual ad, saving you time during setup.
It also allows for seamless data import into Google Analytics, enabling detailed performance analysis within that platform.
To enable auto-tagging at the account level, navigate to Admin > Account settings.
Find the box for auto-tagging and check the box to tag ad URLs, then click Save.
 Screenshot from Google Ads, September 2024
Step 2: Link Any Relevant Accounts
Linking various accounts and tools enhances your campaign’s effectiveness by providing deeper insights and seamless data flow.
Now, this step may come sooner if you plan to import conversions from Google Analytics into Google Ads, as the accounts will have to be linked prior to importing conversions.
To link accounts, navigate to Tools > Data manager.
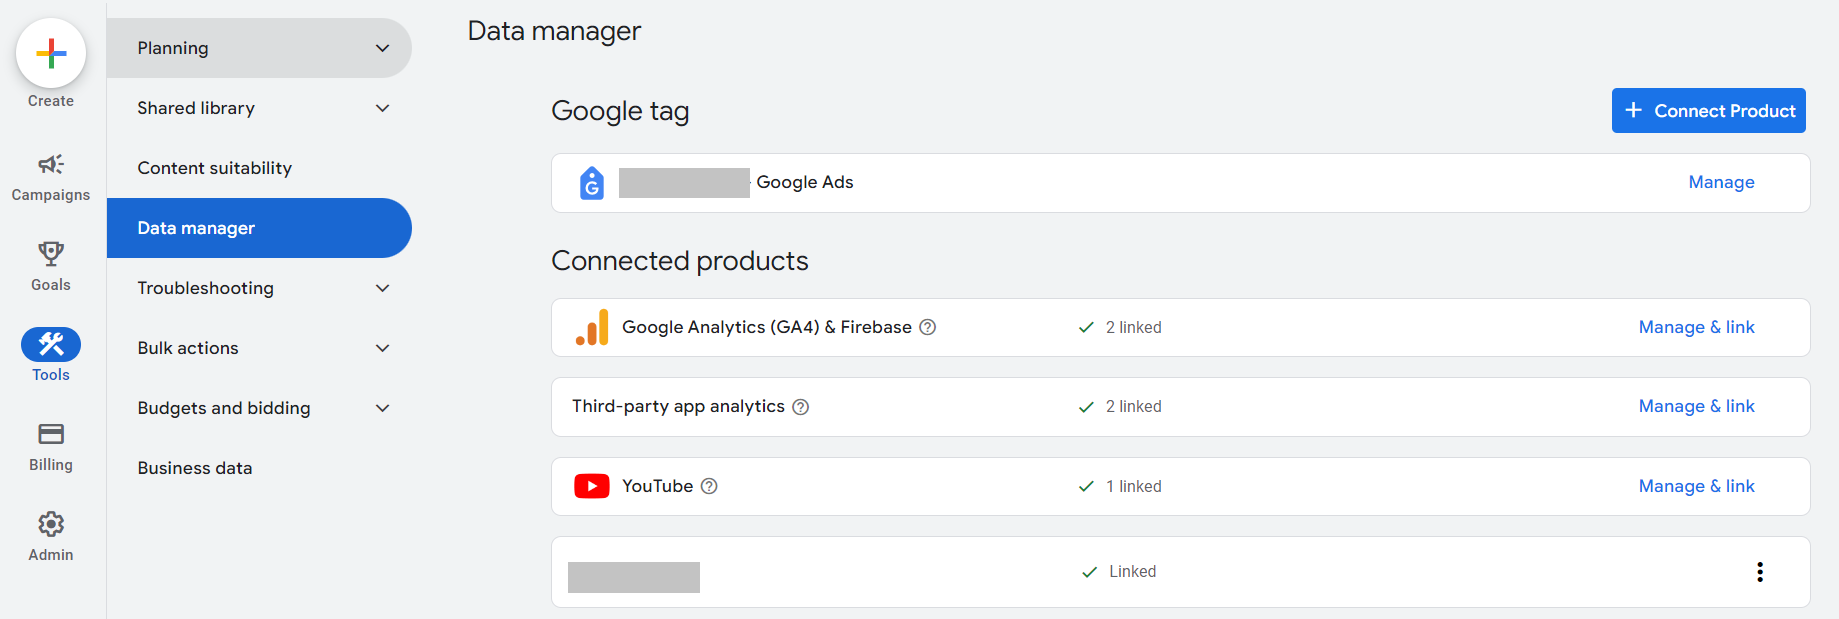 Screenshot from Google Ads, September 2024
You can link accounts such as:
- Google Analytics.
- YouTube channel(s).
- Third-party analytics.
- Search Console.
- CRM tools (Salesforce, Zapier, etc.).
- Ecommerce platforms (Shopify, WooCommerce, etc.).
- Tag Manager.
- And more.
Step 3: Conduct Keyword Research & Structure Your Campaign
Now that you’ve got the foundations of goals and conversions covered, it’s time to complete some keyword research.
A robust keyword strategy ensures your ads reach the right audience, driving qualified traffic to your site.
Start With A Seed List
Not sure where to start? Don’t sweat it!
Start by listing out fundamental terms related to your products or services. Consider what your customers would type into a search engine to find you.
Doing keyword research into search engines in real-time can help discover additional popular ways that potential customers are already searching, which can uncover more possibilities.
Additionally, use common language and phrases that customers use to ensure relevance.
Use Keyword Research Tools
The Google Ads platform has a free tool built right into it, so be sure to utilize it when planning your keyword strategy.
The Google Keyword Planner gives you access to items like:
- Search volume data.
- Competition levels.
- Keyword suggestions.
- Average CPC.
All these insights help not only determine what keywords to bid on but also help form the ideal budget needed to go after those coveted keywords.
When researching keywords, try to identify long-tail keywords (typically, these are phrases with more than three words). Long-tail keywords may have lower search volume but have higher intent and purchase considerations.
Lastly, there are many paid third-party tools that can offer additional keyword insights like:
These tools are particularly helpful in identifying what competitors are bidding on, as well as finding gaps or opportunities that they are missing or underserving.
Group Keywords Into Thematic Ad Groups
Once you have your core keywords identified, it’s time to group them together into tightly-knit ad groups.
The reason for organizing them tightly is to increase the ad relevance as much as possible. Each ad group should focus on a single theme or product category.
As a good rule of thumb, I typically use anywhere from five to 20 keywords per ad group.
Another item to keep in mind is which match types to use for keyword bidding. See the example below from Google on the three keyword match types available:
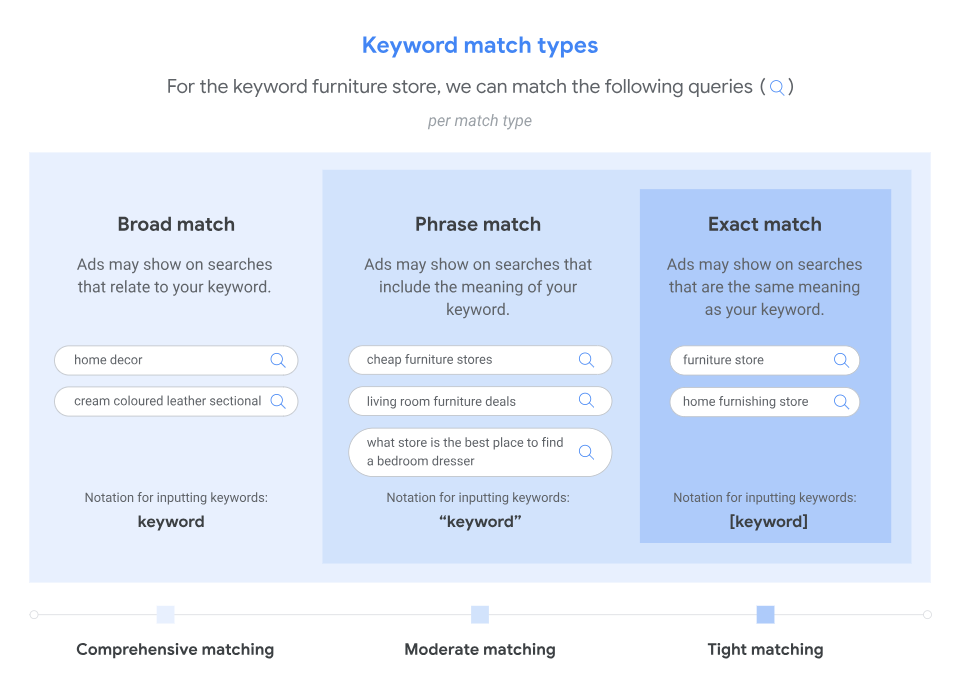 Image credit: support.google.com, September 2024
Create A Hierarchical Campaign Structure
Once your ad groups have been segmented, it’s time to build the campaign structure(s).
You’ll want to divide your account into campaigns based on broader categories, such as:
- Product lines.
- Geographic regions.
- Marketing goals.
- Search volume.
For example, you can create one campaign for “Running Shoes.” Within that campaign, you create three ad groups:
- Men’s running shoes.
- Women’s running shoes.
- Trail running shoes.
Now, there may be times when you have a keyword with an abnormally higher search volume than other keywords within a particular category.
Depending on your budget, it may be worth segmenting those high-volume search term(s) into its own campaign solely for better budget optimization.
If a high-volume keyword is grouped into ad groups with low-volume keywords, it’s likely that most of the ads served will be for the high-volume keyword.
This then inhibits the other low-volume keywords from showing, and can wreak havoc on campaign performance.
Utilize Negative Keywords
Just as the keywords you bid on are crucial to success, so are the negative keywords you put into place.
Negative keywords can and should be added and maintained as ongoing optimization of any paid search campaign strategy.
The main benefit of negative keywords is the ability to exclude irrelevant traffic. They prevent your ads from showing on irrelevant searches, saving budget and improving CTR over time.
Negative keywords can be added at the ad group, campaign, or account level.
Step 4: Configure Campaign Settings
Now that you’ve got the campaign structure ready to go, it’s time to start building and configuring the campaign settings.
Campaign settings are crucial to get right in order to optimize performance towards your goals.
There’s something to be said with the phrase, “The success is in the settings.” And that certainly applies here!
Choose The Right Bidding Strategy
You’ll have the option to choose a manual cost-per-click (CPC) or an automated bid strategy. Below is a quick rundown of the different types of bid strategies.
- Manual CPC: Allows you to set bids for individual keywords, giving you maximum control. Suitable for those who prefer more hands-on management.
- Target Return on Ad Spend (ROAS): Optimizes bids to maximize revenue based on a target ROAS you set at the campaign level.
- Target Cost Per Acquisition (CPA): Optimizes bids to achieve conversions at the target CPA you set at the campaign level.
- Maximize Conversions: Sets bids to help get the most conversions for your budget.
Set Your Daily Budget Accordingly
Review your monthly paid search budget and calculate how much you can spend per day throughout the month.
Keep in mind that some months should be different to account for seasonality, market fluctuations, etc.
Additionally, be sure to allocate campaign budgets based on goals and priorities to maximize your return on investment.
You’ll also want to keep in mind the bid strategy selected.
For example, say you set a campaign bid strategy with a Target CPA of $30. You then go on to set your campaign daily budget of $50.
That $50 daily budget would likely not be enough to support the Target CPA of $30, because that would mean you’d get a maximum of two conversions per day, if that.
For bid strategies that require a higher CPA or higher ROAS, be sure to supplement those bid strategies with higher daily budgets to learn and optimize from the beginning.
Double-Check Location Settings
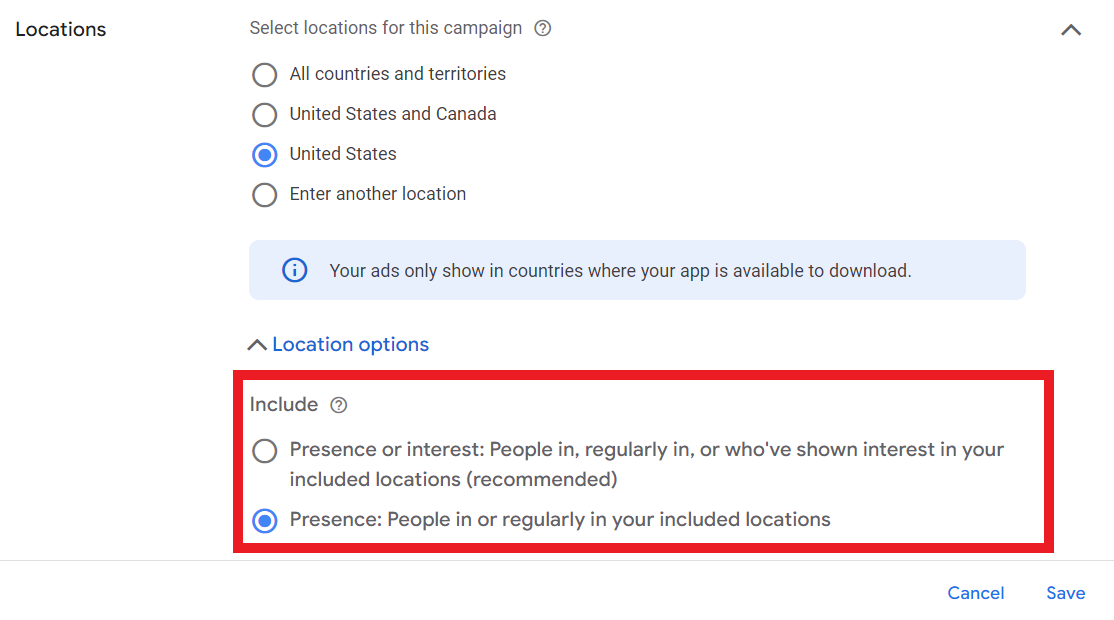
When choosing locations to target, be sure to look at the advanced settings to understand how you’re reaching those users.
For example, if you choose to target the United States, it’s not enough to enter “United States” and save it.
There are two options for location targeting that many fail to find:
- Presence or interest: People in, regularly in, or who’ve shown interest in your included locations.
- Presence: People in or regularly in your included locations.
 Screenshot from Google Ads, September 2024
Google Ads defaults to the “presence or interest” setting, which I’ve seen time and time again where ads end up showing outside of the United States, in this example.
Again, the success is in the settings.
There are more settings to keep in mind when setting up your first paid search campaign, including:
- Ad scheduling.
- Audience targeting.
- Device targeting.
- And more.
Step 5: Write Compelling Ad Copy
Your ad copy is the gateway to attracting qualified customers.
Crafting the perfect mix of persuasion and relevancy into your ad copy can significantly impact your campaign’s success.
Create Attention-Grabbing Headlines
The headline is the most prominent part of the ad copy design on the search engine results page. Since each headline has a maximum character limit of 35 characters, it is important to make them count.
With Responsive Search Ads, you can create up to 15 different headlines, and Google will test different variations of them depending on the user, their search query, and multiple other factors to get that mix right.
Below are some tips for captivating a user’s attention:
- Use Primary Keywords: Include your main keywords in the headline to improve relevance and Quality Score.
- Highlight Unique Selling Points (USPs): Showcase what sets your product or service apart, such as free shipping, 24/7 support, or a unique feature.
- Incorporate Numbers and Statistics: Use numbers to catch attention, like “50% Off” or “Join 10,000+ Satisfied Customers.”
- Include a Strong Call-to-Action (CTA): Encourage immediate action with phrases like “Buy Now,” “Get a Free Quote,” or “Sign Up Today.”
Write Persuasive Descriptions
Description lines should complement the headline statements to create one cohesive ad.
Typically, two description lines are shown within any given ad. Each description line has a 90-character limit.
When creating a Responsive Search Ad, you can create four different descriptions, and then the algorithm will show variations of copy tailored to each individual user.
- Expand on Headlines: Provide additional details that complement your headline and reinforce your message.
- Address Pain Points: Highlight how your product or service solves specific problems your audience faces.
- Use Emotional Triggers: Appeal to emotions by emphasizing benefits like peace of mind, convenience, or excitement.
- Incorporate Keywords Naturally: Ensure the description flows naturally while including relevant keywords to maintain relevance.
Make Use Of Ad Assets (Formerly Extensions)
Because of the limited character count in ads, be sure to take advantage of the myriad of ad assets available as complements to headlines and descriptions.
Ad assets help provide the user with additional information about the brand, such as phone numbers to call, highlighting additional benefits, special offers, and more.
Some of the main ad assets used include:
- Sitelinks.
- Callouts.
- Structured Snippets.
- Calls.
- And more.
You can find a full list of available ad assets in Google Ads here.
Step 6: Ensure An Effective Landing Page Design
You’ve spent all this time crafting your paid search campaign strategy, down to the keyword and ad copy level.
Don’t stop there!
There’s one final step to think about before launching your first paid search campaign: The landing page.
Your landing page is where users land after clicking your ad. An optimized landing page is critical for converting traffic into valuable conversions and revenue.
Ensure Relevancy And Consistency
The content and message of your landing page should directly correspond to your ad copy. If your ad promotes a specific product or offer, the landing page should focus on that same product or offer.
Use similar language, fonts, and imagery on your landing page as in your ads to create a cohesive user experience.
Optimize For User Experience (UX)
If a user lands on a page and the promise of the ad is not delivered on that page, they will likely leave.
Having misalignment between ad copy and the landing page is one of the quickest ways to waste those precious advertising dollars.
When looking to create a user-friendly landing page, consider the following:
- Mobile-Friendly Design: Ensure your landing page is responsive and looks great on all devices, particularly mobile, as a significant portion of traffic comes from mobile users.
- Fast Loading Speed: Optimize images, leverage browser caching, and minimize code to ensure your landing page loads quickly. Slow pages can lead to high bounce rates.
- Clear and Compelling Headline: Just like your ad, your landing page should have a strong headline that immediately communicates the value proposition.
- Concise and Persuasive Content: Provide clear, concise information that guides users toward the desired action without overwhelming them with unnecessary details.
- Prominent Call-to-Action (CTA): Place your CTA above the fold and make it stand out with contrasting colors and actionable language. Ensure it’s easy to find and click.
Step 7: Launch Your Campaign
Once you’ve thoroughly completed these six steps, it’s time to launch your campaign!
But remember: Paid search campaigns are not a “set and forget” strategy. They must be continuously monitored and optimized to maximize performance and identify any shifts in strategy.
Create a regular optimization schedule to stay on top of any changes. This could look like:
- Weekly Reviews: Conduct weekly performance reviews to identify trends, spot issues, and make incremental improvements.
- Monthly Strategy Sessions: Hold monthly strategy sessions to assess overall campaign performance, adjust goals, and implement larger optimizations.
- Quarterly Assessments: Perform comprehensive quarterly assessments to evaluate long-term trends, budget allocations, and strategic shifts.
When it comes to optimizing your paid search campaign, make sure you’re optimizing based on data. This can include looking at:
- Pause Underperforming Keywords: Identify and pause keywords that are not driving conversions or are too costly.
- Increase Bids on High-Performing Keywords: Allocate more budget to keywords that are generating conversions at a favorable cost.
- Refine Ad Copy: Continuously test and refine ad copy based on performance data to enhance relevance and engagement.
- Enhance Landing Pages: Use insights from user behavior on landing pages to make data-driven improvements that boost conversion rates.
Final Thoughts
Setting up your first paid search campaign involves multiple detailed steps, each contributing to the overall effectiveness and success of your advertising efforts.
By carefully defining your goals, linking relevant accounts, conducting thorough keyword research, configuring precise campaign settings, crafting compelling ad copy, and optimizing your landing pages, you lay a strong foundation for your campaign.
Remember, the key to a successful paid search campaign is not just the initial setup but also ongoing monitoring, testing, and optimization.
Embrace a mindset of continuous improvement, leverage data-driven insights, and stay adaptable to maximize your campaign’s potential.
More resources:
Featured Image: vladwel/Shutterstock
