Tracking form submissions is a crucial aspect of marketing success, as it allows organizations to gather valuable data about their audience and their preferences.
By keeping track of the forms submitted, companies can identify which marketing campaigns are most effective, what kind of content resonates with their target audience, and which channels drive the most conversions.
Additionally, tracking form submissions helps organizations to understand the customer journey – from initial contact to conversion – providing insight into areas for improvement.
While there are seemingly infinite ways to track form submissions on your website, I recommend using Google Tag Manager to do the leg work, so that it’s easier to send the right data to publisher platforms (think Google Analytics, Google Ads, Facebook, and LinkedIn).
Why You Should Use Google Tag Manager
Google Tag Manager is an essential tool for form tracking as it provides a centralized platform for managing tracking tags and marketing code snippets on a website.
By integrating form tracking with Google Tag Manager, both individuals and businesses can easily track form submissions and gather valuable data without having to manually add code to their websites.
This saves time and reduces the risk of errors that can arise from manual implementation.
Additionally, Google Tag Manager provides a user-friendly interface that allows marketers to create, manage, and implement tracking tags without the need for technical skills.
How To Track Form Submissions In Google Tag Manager
Google Tag Manager listens for events on your website, called “triggers,” and runs code snippets with necessary data, called “tags,” when appropriate.
There are a few different triggers that can be used to track forms, including the following, ranked by reliability:
- Confirmation Page Views.
- Success Message Visibility.
- Data Layer Events.
- Auto Event Listener.
- AJAX Event Listener.
- DOM Scraping.
- Custom Event Listener.
While all of these triggers work, the one that I’ve seen the most success with is the first: Confirmation Page Views.
Instead of having the form send a signal to Google Tag Manager when someone fills out a form, we can track when a user lands on a confirmation or “thank you” page after filling out that form.
Step 1: Setting Up A Confirmation Page In WordPress
If you’re using WordPress to manage your website content, there are plenty of plugins that you can use to integrate functional and good-looking forms on your website.
My favorite, and the one my agency uses, is Gravity Forms.
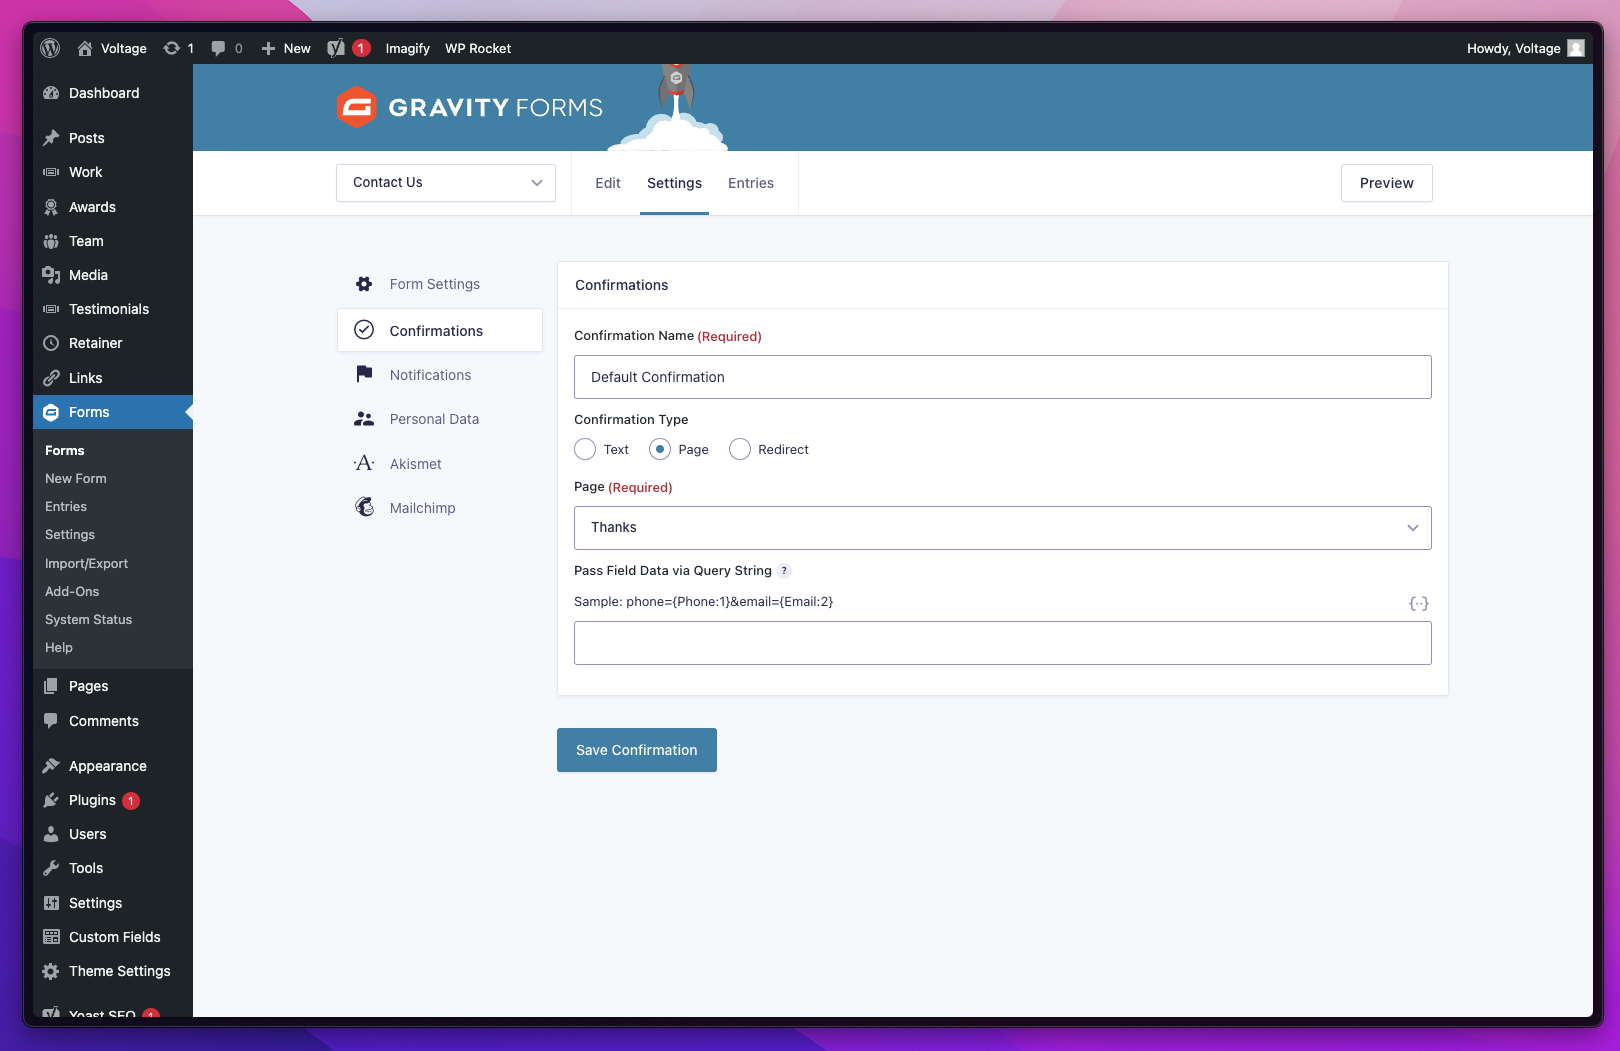
In Gravity Forms, you can set up a “Confirmation” for your form to send users to a page of your choosing, and even carry over form data to that page for more advanced tracking.
 Screenshot from Gravity Forms, February 2023
If Gravity Forms isn’t for you, there are an endless amount of plugins that can do the job, including WPForms, Ninja Forms, and HubSpot.
Step 2: Setting Up A Trigger In Google Tag Manager
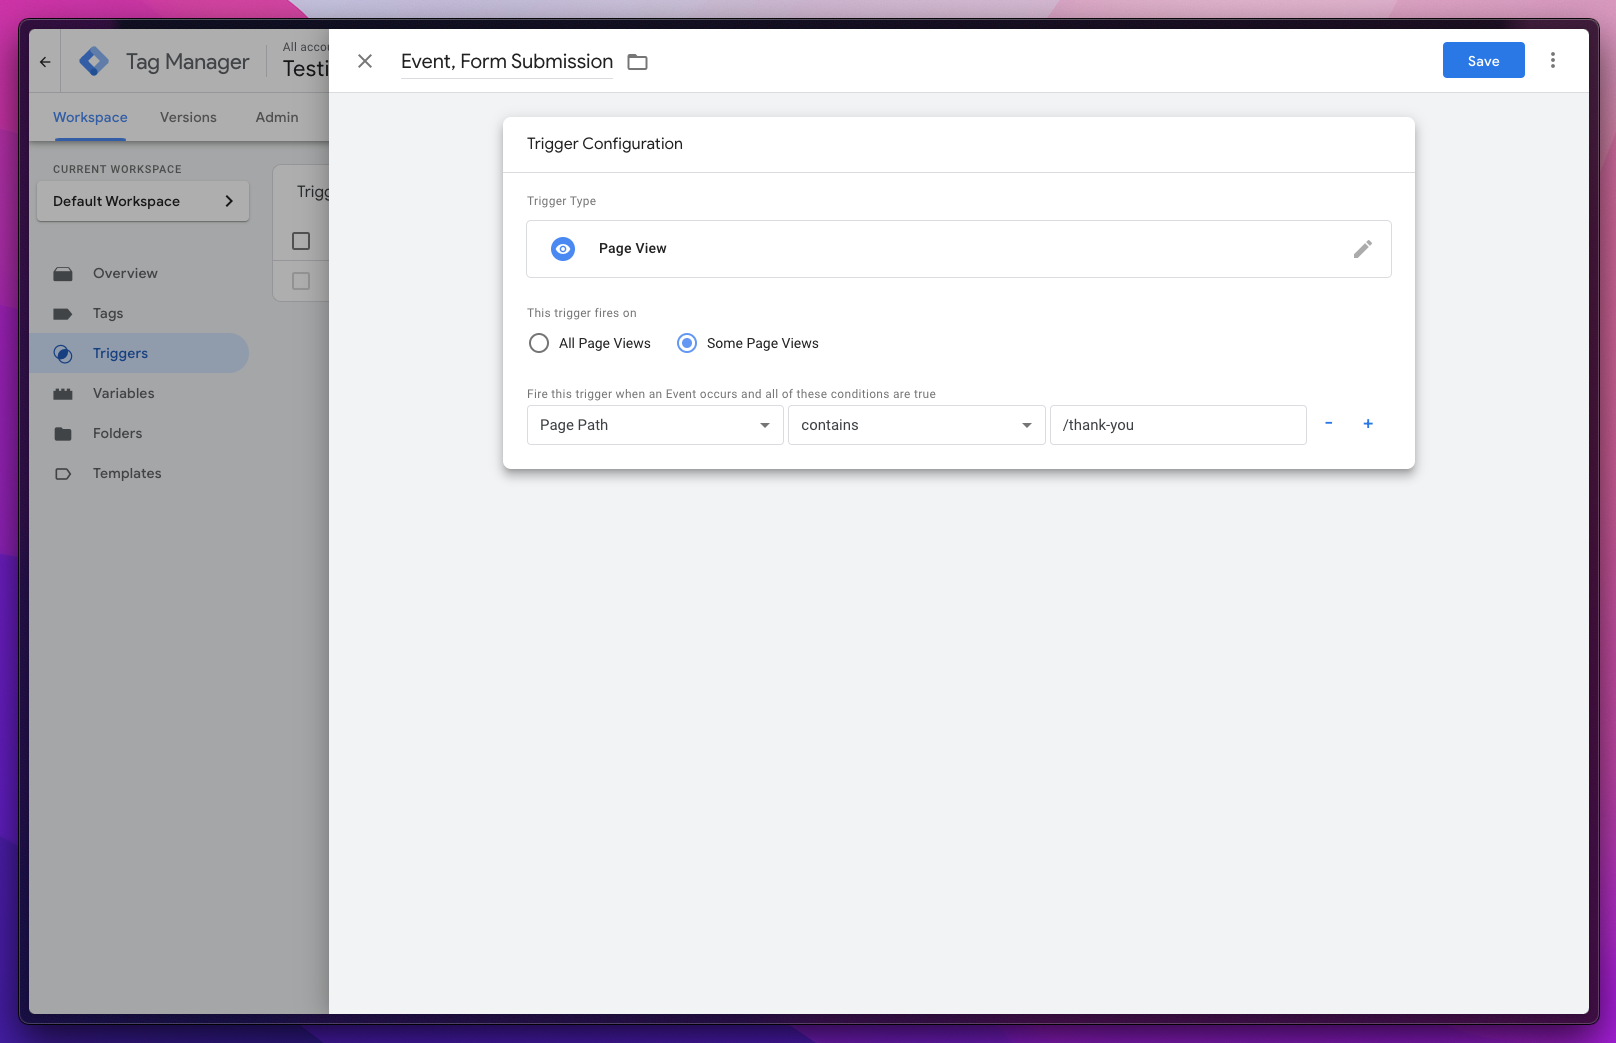
After setting up a confirmation page, the next step is to set up a “trigger” in Google Tag Manager.
Make sure that your trigger is listening for a page view event on only your confirmation page (like the configuration shown below).
 Screenshot from Google Tag Manager, February 2023
Step 3: Setting Up A Tag For Google Analytics 4
After confirming the right data is getting to Google Tag Manager, using a tool like GTM’s native debugger or GTM’s popular Chrome extension, you can start sending that data to marketing and reporting platforms like Google Analytics.
With everyone switching from Universal Analytics to Google Analytics 4 (GA4), we figured this would be the most helpful example to demonstrate how easy form tracking is in GTM.
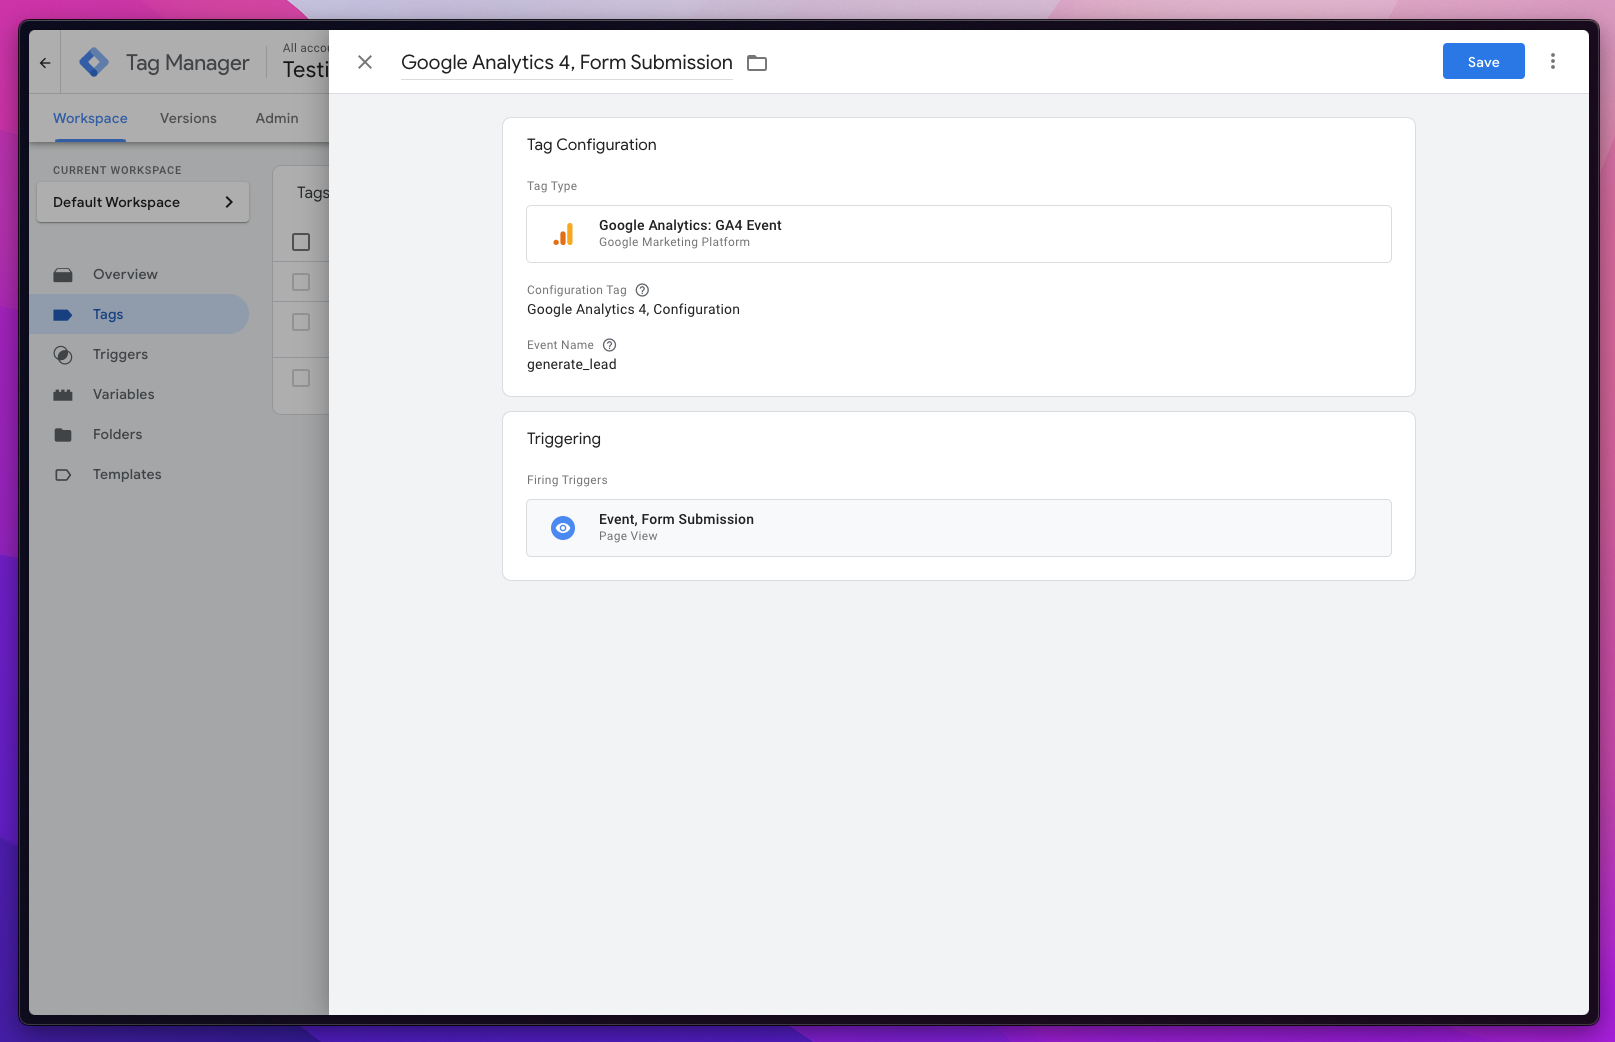
Just be sure to use the “Google Analytics: GA4 Event” template tag, choose the right GA4 configuration tag (or type in your GA4 property ID directly) and choose the right event name.
In most cases, “generate_lead” will be the best choice, but there are a ton of other native events in GA4 to choose from.
 Screenshot from Google Tag Manager, February 2023
Step 4: Start Seeing Results
Now that Google Tag Manager is collecting data and sending it to Google Analytics 4, you should be able to see that data in your GA4 reports (it might take a day or two to see results if you’re checking in real-time).
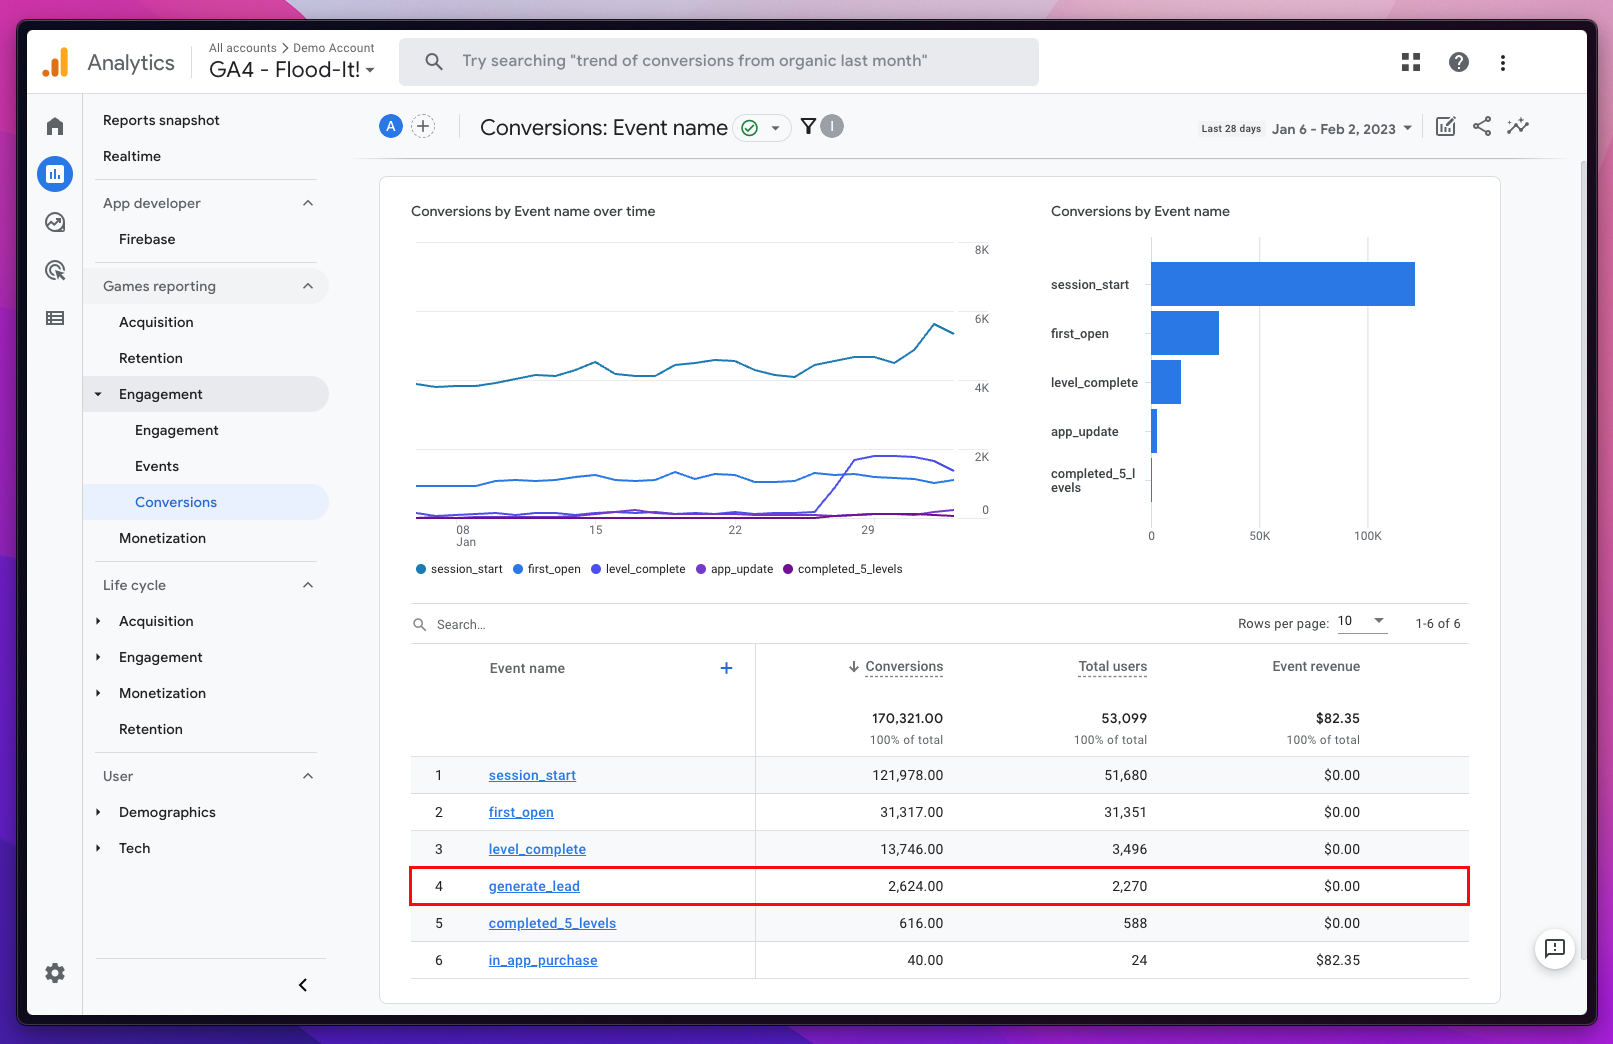
If you used the “generate_lead” event described above, page views to the confirmation page will automatically be flagged as a conversion.
If not, you might need to mark the event name as a conversion first.
Then, you can use GA4’s conversion report to see how many form submissions you’re collecting, and even layer in different dimensions and metrics for advanced acquisition and behavior insights.
 Screenshot from Google Analytics, February 2023
Conclusion
Whether you are an experienced marketer or just starting out, form tracking in GTM and WordPress provides a straightforward and efficient solution for tracking form submissions and understanding where leads are coming from, how they’re interacting with the website, and why they’re interested in you.
While the solution above is the most popular and reliable, there are plenty that are well-suited for websites that have more customized forms and website logic.
Be sure to consult a developer if you run into any issues along the way!
More Resources:
Featured Image: G-Stock Studio/Shutterstock