Type a couple of hundred words and publish them somewhere—poof, you have a blog post. Or do you?
If a blog post is published and no one reads it, is it still a blog post?
Anyone can write a blog post. But not everyone can create one that people want to read.
In this post, you’ll learn how to write blog posts that actually get readers.
Let’s get started.
A proven topic is a topic that people want to read about.
If you’re familiar with the niche, then this shouldn’t be a biggie. You probably already have a lot of ideas you want to cover. Open Google Docs and write all of them down (use a notepad if you prefer analog).
Otherwise, there’s no better way to find proven topics than to write about topics people are searching for. After all, if there are many people searching for the same topic month after month, then it’s very likely it’s something they want to read about.
Here’s how to find these topics:
- Go to Ahrefs’ Keywords Explorer
- Enter a term relevant to your site or niche
- Go to the Matching terms report
- Switch the tab to Questions

Shop around a little and look for the topics that interest you. Make a list—5 to 10 should be enough to start with.
Ideally, they should have some traffic potential too. Our metric, Traffic Potential, is the estimated amount of search traffic you can potentially gain if you rank #1 for that topic. You can see if a topic has Traffic Potential by looking at the TP column.
With more than 4.4 million new blog posts published each day, your blog post has to stand out. Otherwise, it won’t get discovered and no one will read it.
The key ingredient here is novelty.
According to Julian Shapiro, there are five novelty categories:
- Counter-intuitive – “Oh, I never realized the world worked that way.”
- Counter-narrative – “Wow, that’s not how I was told the world worked!”
- Shock and awe – “That’s crazy. I would have never believed it.”
- Elegant articulations – “Beautiful. I couldn’t have said it better myself.”
- Make someone feel seen – “Yes! That’s exactly how I feel!”
For example, check out this blog post by finance writer Morgan Housel:

He states something that is counter-intuitive to what most people know and think. The best idea or “truth” doesn’t win—instead, the best story does. This is incredibly compelling to people in his field of finance. Indeed, it stands out from the other news-based, fact-driven kind of articles they read.
Morgan does this all the time. He rarely writes about finance directly—instead, he’s always looking at the topic from the lenses of history, biology, anthropology, psychology, and more. It makes his posts unique, and the angle of his articles always stands out.
It’s what you must do. So take your time and think of an angle that is unique and novel to your target audience. Use these questions to get started:
- Do you have personal experience with this topic? For example, if you’ve successfully implemented the keto diet, you can write about your experience and how you did it.
- Can you interview experts? For example, you can interview an expert about the latest research and findings in the keto world.
- Can you crowdsource opinions and ideas? For example, if you’re writing about making keto-friendly ice cream, you can crowdsource recipes.
- Can you provide data or back your post with science? Consider running a study (if possible) or looking through scientific research papers.
- Can you be contrarian? Don’t be the devil’s advocate just for the sake of it. But if you truly have an opinion that’s opposite to everyone else’s, it can be a great angle.
Editor’s Note
If you’re blogging with SEO in mind, then you’ll likely have to match search intent. Search intent is the why behind a search query. We can look at the current top-ranking pages to figure it out.
Specifically, we want to understand the three Cs of search intent:
- Content type – Is there a dominant type of content on the SERP, such as blog posts, product pages, videos, or landing pages? If you followed step #1, this is most likely a blog post.
- Content format – Is there a dominant content format on the SERP, such as guides, listicles, news articles, opinion pieces, or reviews?
- Content angle – Is there a dominant angle on the SERP, such as freshly updated content or content aimed at beginners?
For example, let’s look at the topic of “date ideas”:
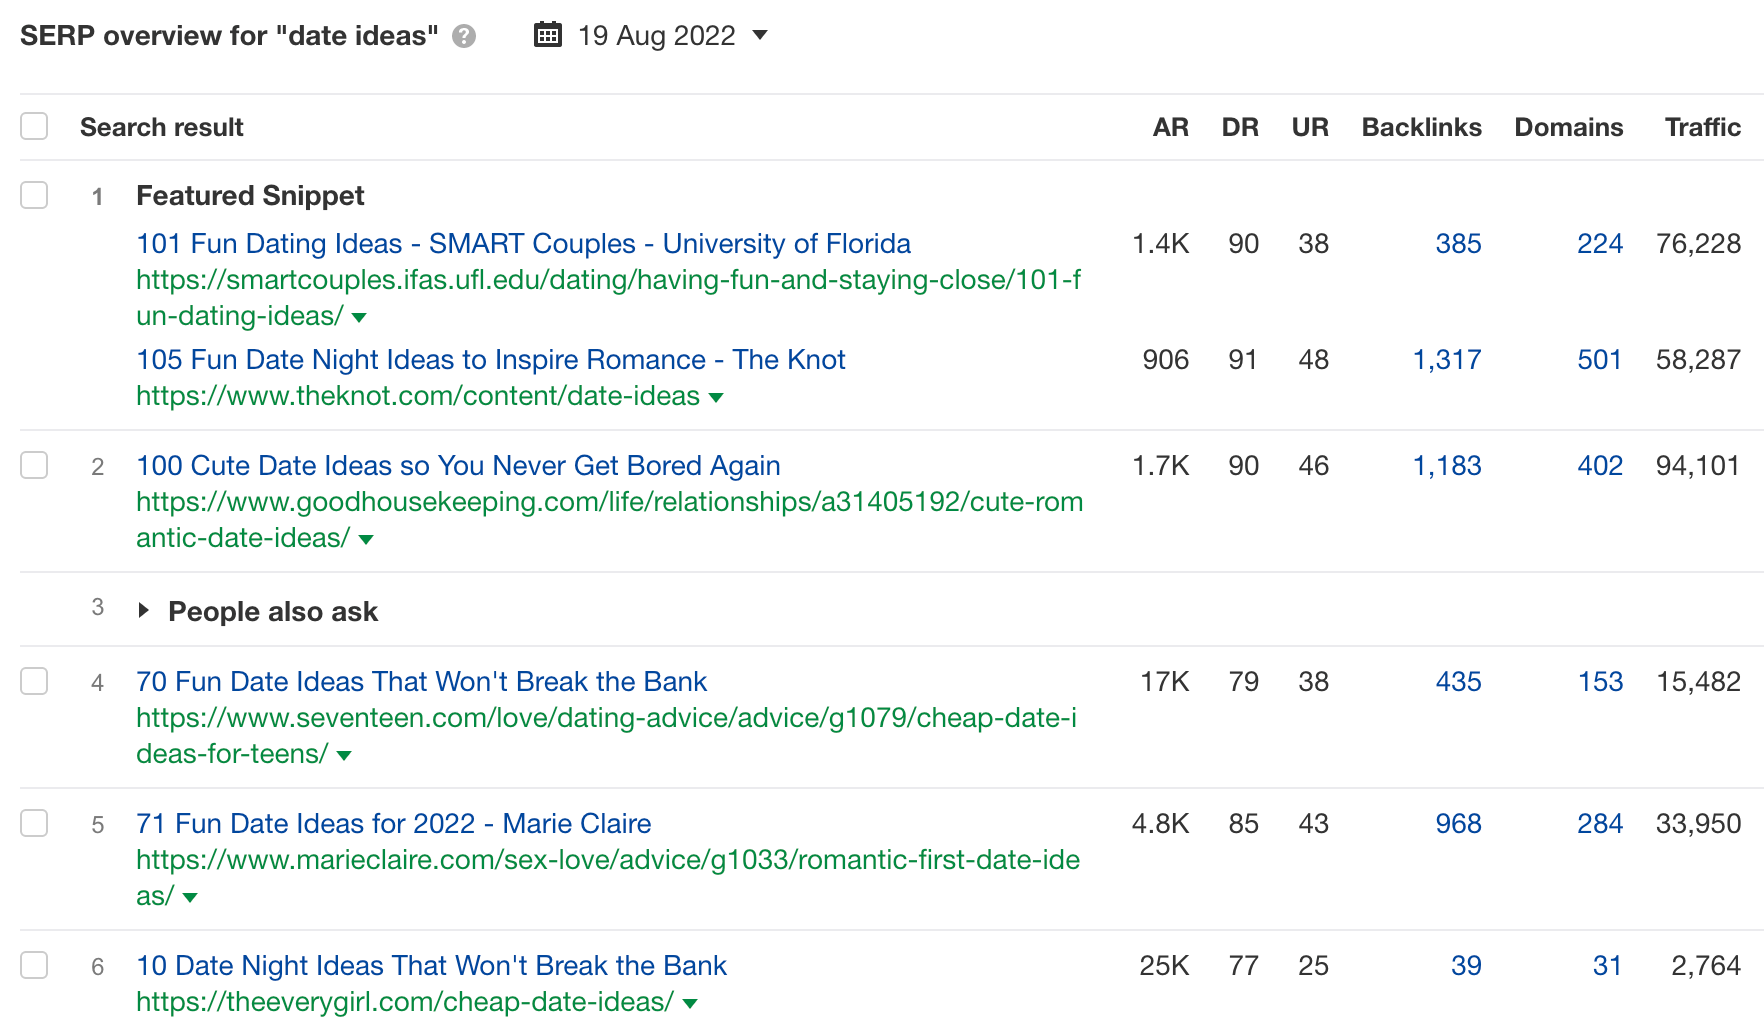
- Content type – They’re all blog posts.
- Content format – They’re all listicles.
- Content angle – A potential angle is “fun date ideas.”
If you’re writing about this topic, you may have to create something similar.
But note that this is not a rule but a guideline. Even if your post is ranking high on Google, it still has to stand out from the rest of the ranking articles. So it goes back to finding a novel and unique angle for your article. If you can create one that’s better than the other top-ranking articles, go for it.

The hardest part of writing is facing the blank page. It is possible to sit in front of your computer for six hours and churn nothing out. It happens to the best of us.
Creating an outline “solves” this problem. When you have an outline, you’re not writing from scratch. Instead, you’re filling the “gaps” in it.
What’s even better is that you don’t have to create the outline from scratch either. Spend enough time online, and you’ll realize that most blog posts’ structures are pretty much the same.
So don’t be afraid to use templates. For example, we use this template for almost all our list-style posts:
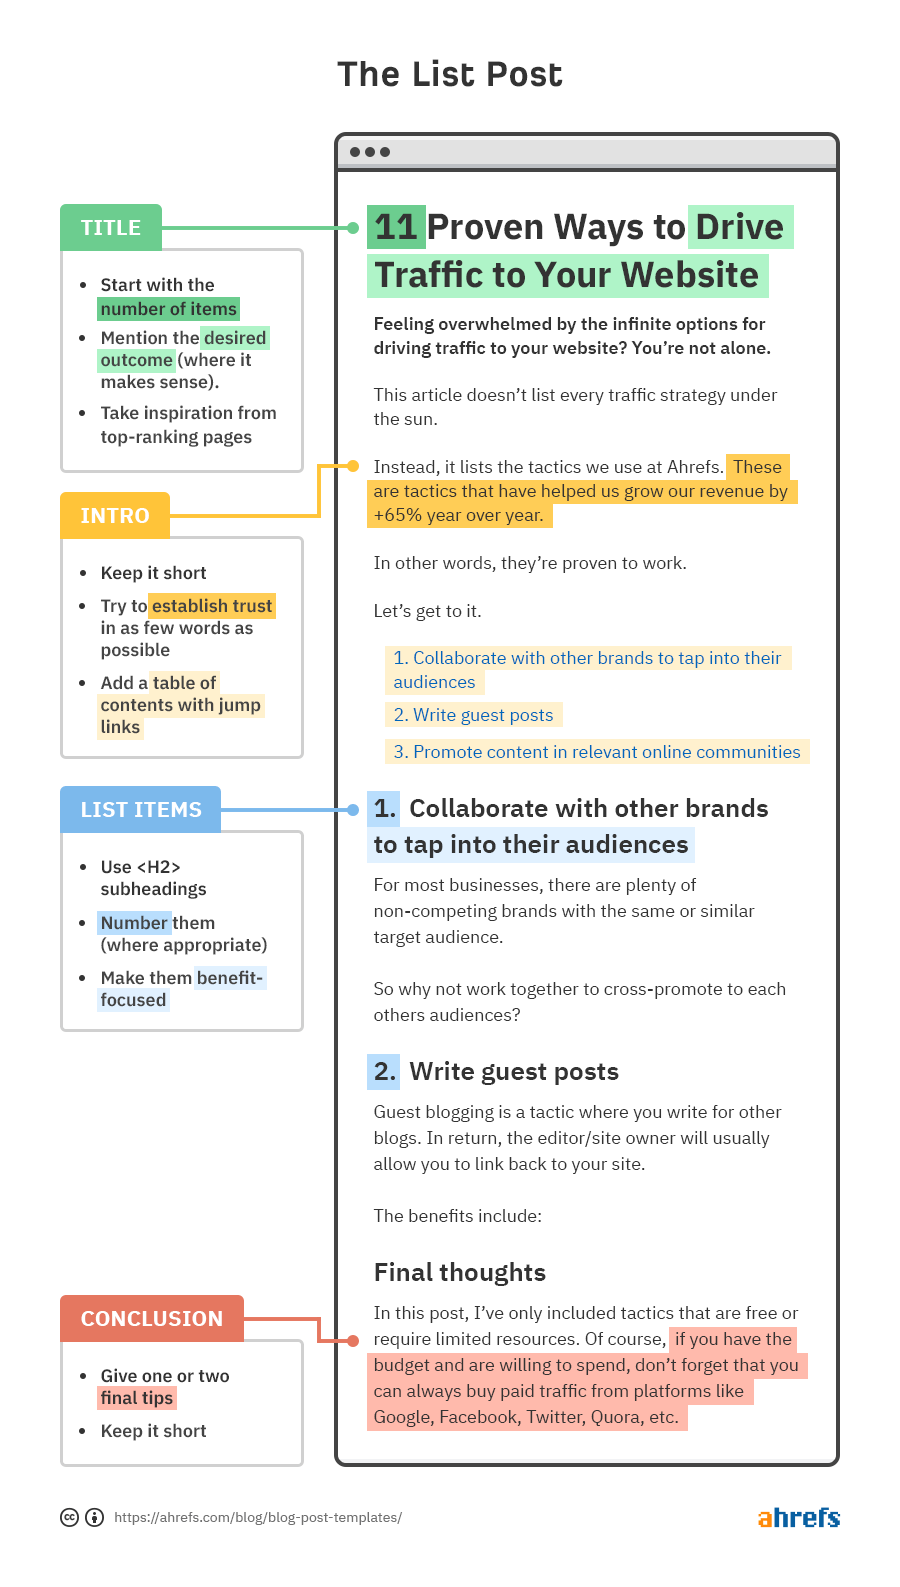
Here are three more templates for other blog post styles you can use.
When you have the skeletal structure in place, the next step is to figure out what you need to fill in, especially the H2s, H3s, H4s, and more. Here are some ideas to help you out:
A. Use your personal experience and expertise
Nothing beats your own experience and expertise. If you know there’s a right way to do something, use that knowledge to create your outline.
For example, I’ve been breakdancing for more than 10 years now. If I had to create a blog post on how to do the six-step, I wouldn’t even need to do any research—I can simply pour the information directly from my brain.
B. Run a content gap analysis
If there are subtopics that almost all the top-ranking pages cover, then it’s likely that they’re important to readers too.
Here’s how to find these subtopics:
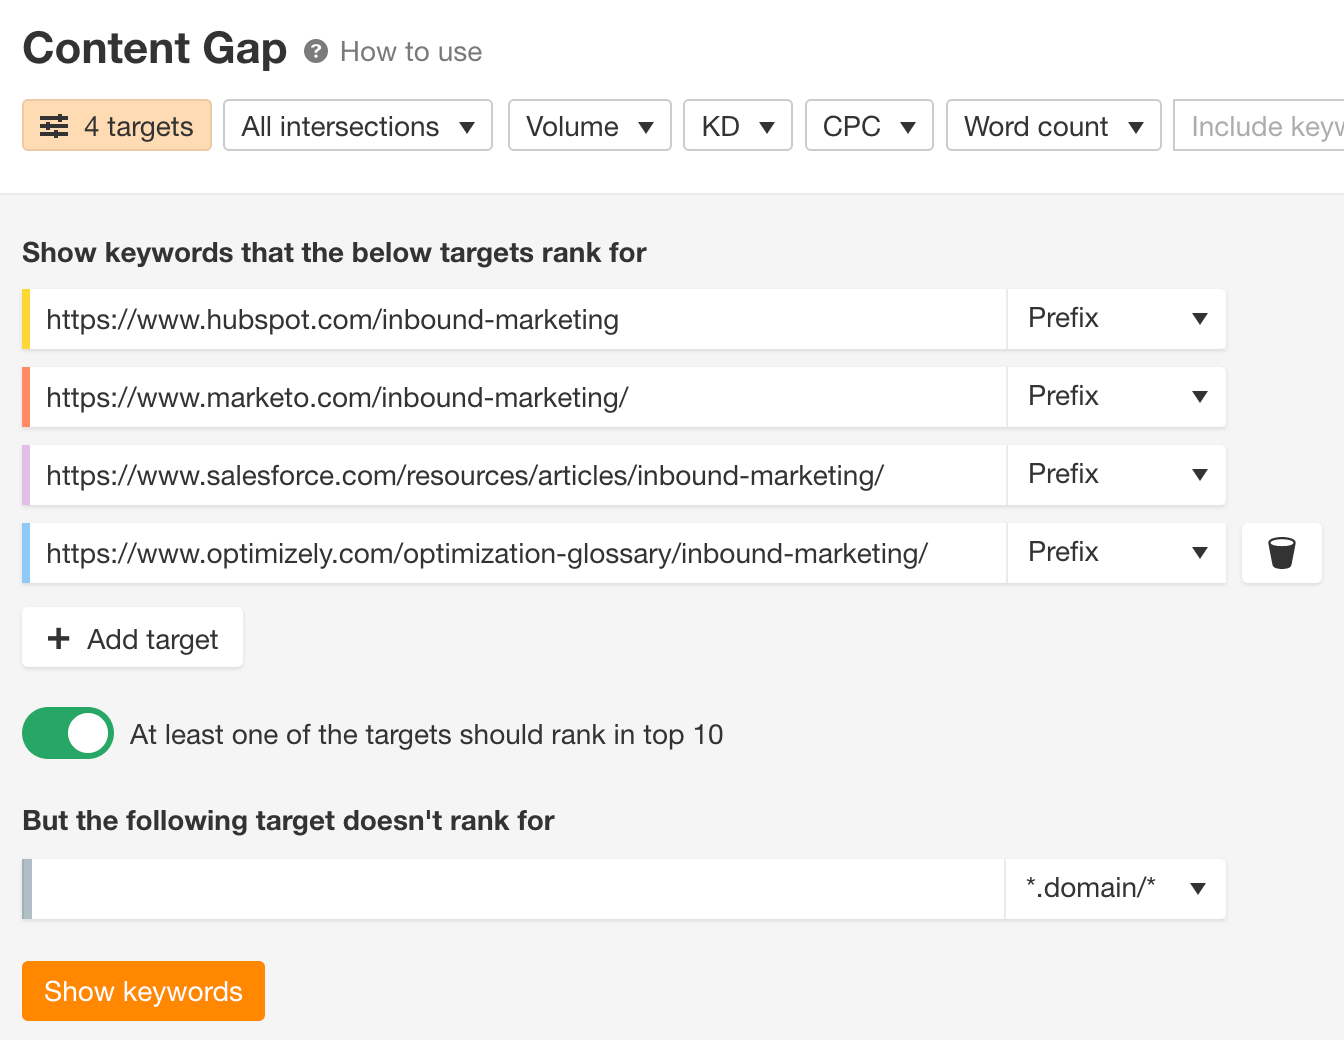
- Paste a few top-ranking URLs for your main topic into Ahrefs’ Content Gap tool
- Leave the bottom section blank
- Hit Show keywords
- Set the Intersection filter to 3 and 4 targets
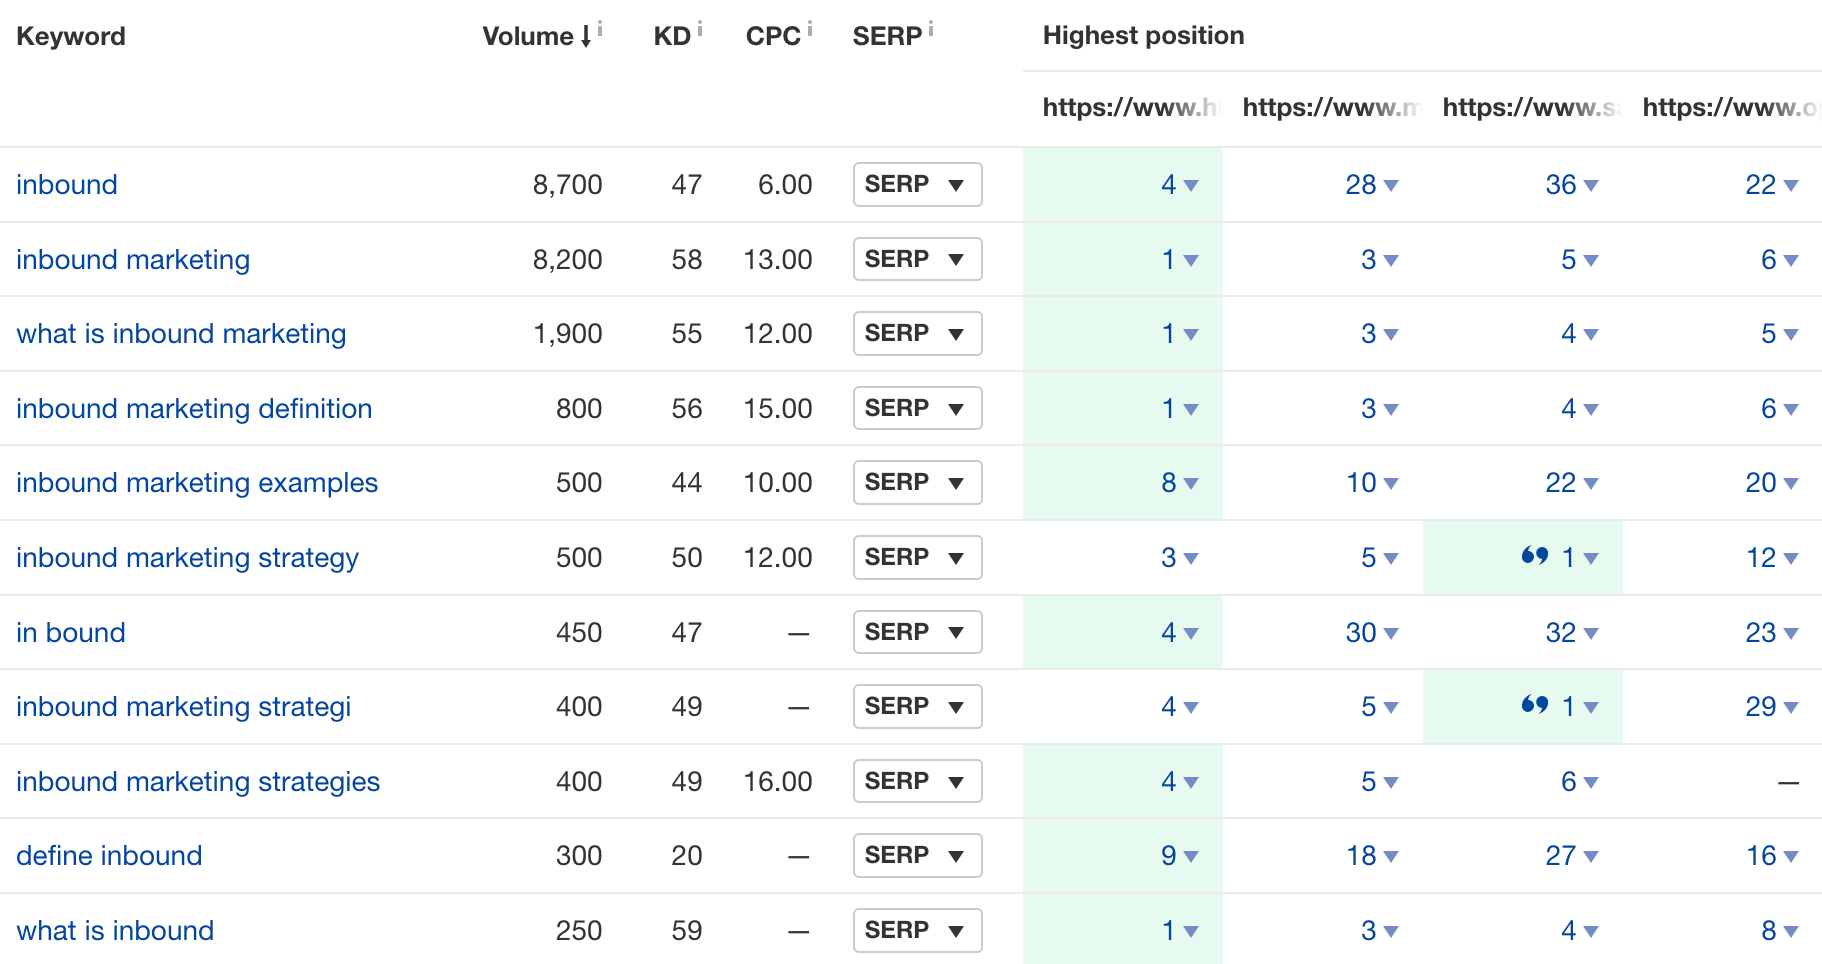
Here, you’ll see that these pages are ranking for subtopics like:
- What is inbound marketing.
- Inbound marketing strategies.
- Inbound marketing examples.
And more.
If you’re writing a blog post on “inbound marketing,” they’ll likely make good H2s.
Note that your goal is not to copy and rephrase the top-ranking pages. The internet’s full of that—cookie-cutter content no one’s interested in.
Your goal is simply to use top-ranking pages as inspiration. If they make good points, you can consider including them in your post. If they’re stating something that’s completely wrong, then even better—take the chance to correct the misconceptions.
With your outline in place, it’s time to flesh that skeleton out into a rough draft.
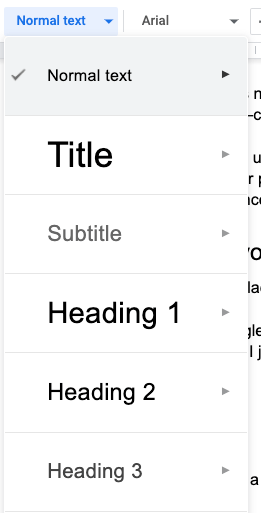
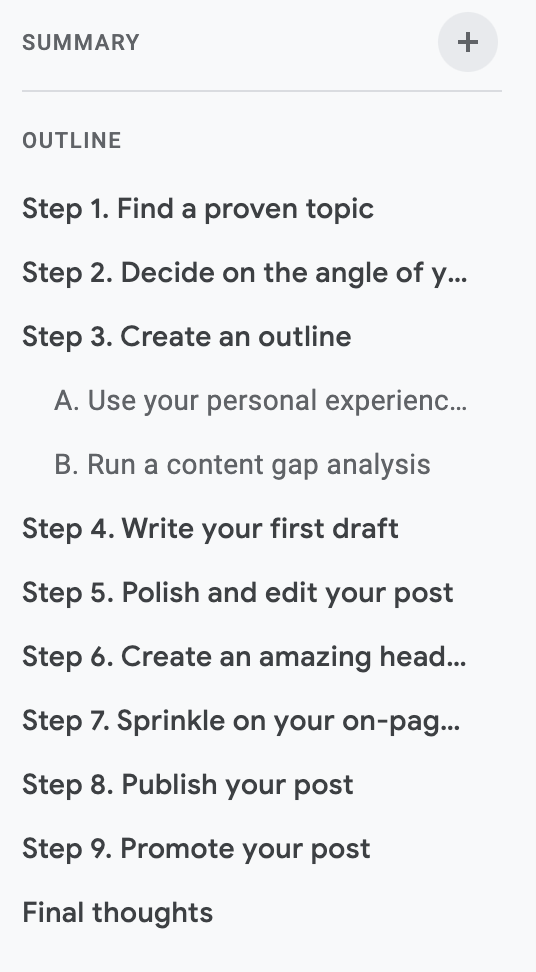
I write mostly in Google Docs. An immediate perk is that I can turn the headings I’ve created into actual headings. I just have to click the “Styles” dropdown on the menu and change them:
You’ll be able to see your outline on the side too:
From here, use your headers as a guide and write your first draft. This stage is all about “getting it out.” That means:
- Avoiding any interruptions to your writing.
- Not self-censoring as you go along.
- Not repeatedly rearranging your outline to make things flow better.
- Not rewriting the same sentence 10 times just because it “doesn’t read quite right.” 😅
I know, I know. It’s easier said than done. Still, try to minimize interruptions. There’s time to edit for perfection later—this stage is all about getting everything down on paper (or screen) so you have something tangible to work with. As author Shannon Hale writes:
I’m writing a first draft and reminding myself that I’m simply shoveling sand into a box so that later I can build castles.
One “trick” you can consider is to use the Pomodoro Technique. It’s my go-to if I’m stuck, distracted, or procrastinating.
The basic idea: Set a timer for 25 minutes, write as much as you can, then take a break for five minutes. Rinse and repeat. You can use a Chrome extension like Marinara to automate your Pomodoros.
Recommendation
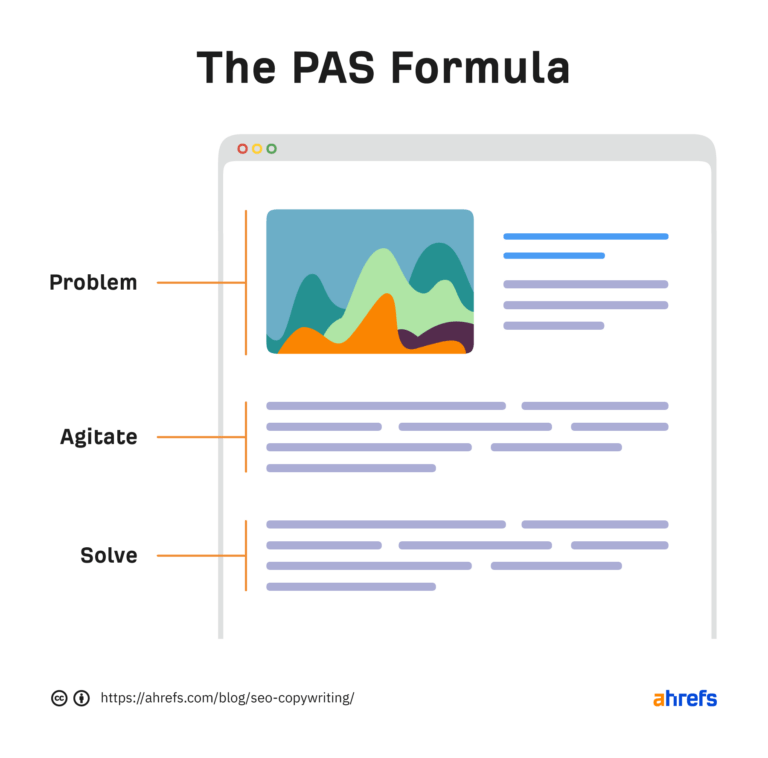
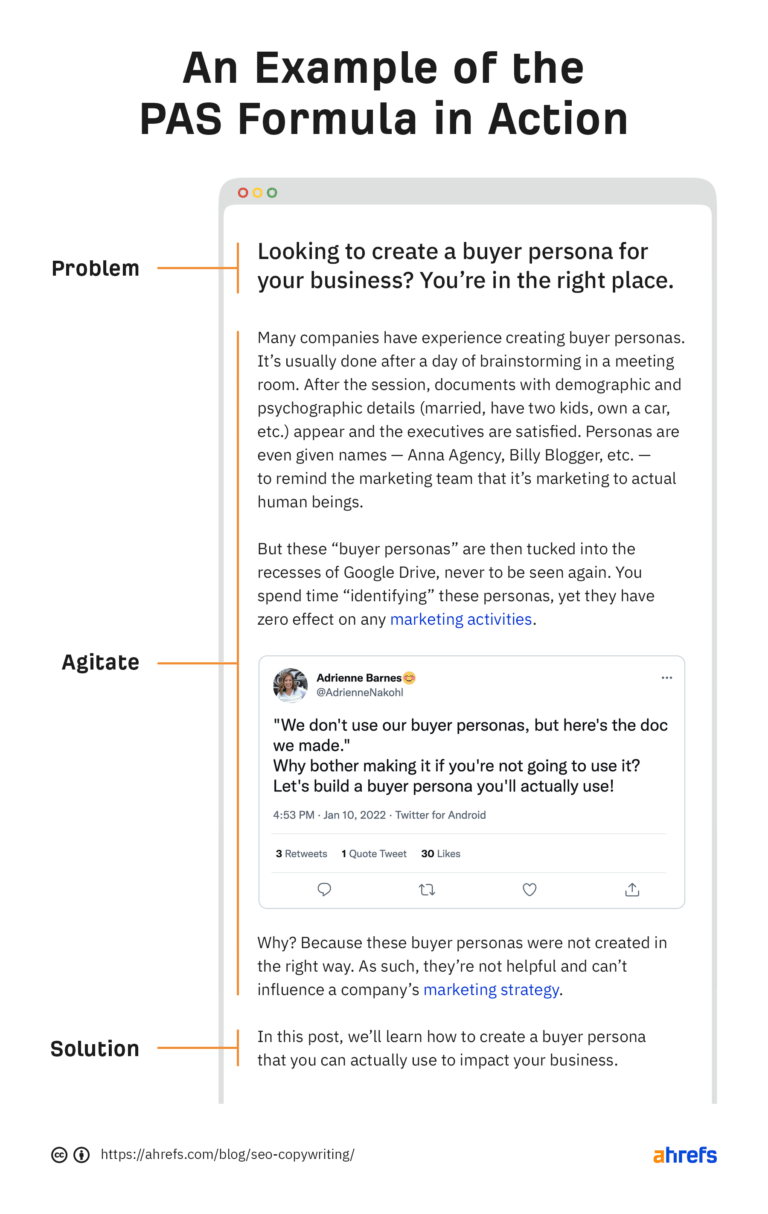
- State the Problem
- Agitate the problem by digging more into the pain (felt by the reader)
- Offer a potential Solution
Here’s what it looks like in the wild:
“I have rewritten—often several times—every word I have ever published. My pencils outlast their erasers.”
Here’s the surprise: Even though the activity is known as “writing,” the magic is not in that. Rather, it’s in the editing phase where the true blog post appears.
This stage—after you’re done with your first draft—is all about editing, polishing, trimming, and rewriting.
My recommendation is to only edit after one or two days have passed. Why? Because you’re too emotionally invested when you’re first done drafting. The time gap will be helpful to remove this attachment so you can actually edit with fresh eyes.
Here’s what you can do during the editing process:
- Use Grammarly – Great for checking grammar mistakes.
- Read your draft out loud – Catch where it doesn’t flow well.
- Break up long sentences – Turn sentences with endless “ands” and “thats” into short, punchier ones.
- Add formatting where relevant – Images, GIFs, bullets, numbered lists, bold, italics, and more make your writing easier to read.
- Pepper in “flow” – Wherever the opportunity arises, consider adding transition words and cliffhangers so that the rhythm of your post is not static.
You should also pay extra attention to your intro, as that is how your reader will decide if they will continue reading.
When you’re done with the self-editing, get feedback from someone else. If you have an editor to show your draft to, great. Otherwise, a friend or colleague works absolutely fine as well.
What’s important here is to get an impartial pair of eyes on your work.
Chances are that a third party will be able to point out things like logical loopholes and poor flow that you won’t be able to spot on your own.
We do this for every blog post at Ahrefs. We even “call out” the contributors:

When they’re done, incorporate their feedback where relevant. Build off their ideas and opinions to produce the best piece of work possible.
Take the time to think about each point that was made. Set aside your ego and really try to see things from a third party’s perspective: Which points do you agree with, which are you unsure about, and which do you definitely not agree with?
Make edits based on the suggestions you believe in and leave out the things you feel strongly against (but be sure to have a logical explanation for doing this). If you’re on the fence, it all comes down to how much you trust the person giving you feedback.
Also, be careful not to accidentally adopt the writing style of a third party, especially if they give feedback in long form or if you’re incorporating many of their suggestions. Again, if possible, take a break from drafting and work on something else. Then, when you come back to it, try and rewrite the section in your own voice and style.
Now is the time to rewrite sentences until they “sound right” or rearrange your points over and over again until they flow the best they can.
Keep getting feedback and revising your draft until you’re happy with the final product.
“On the average, five times as many people read the headline as read the body copy.”
Your headline is one of the most important aspects of your blog post. It determines whether someone decides to click through and read. So you should take the time and polish it until it is compelling.
Don’t stop on the first headline you create. Come up with a few and see which one looks best. Viral site Upworthy notoriously created 25 headlines for each article it published.
I’m not asking you to create clickbait headlines like it. But the exercise can be a fruitful one. As singer-songwriter Ed Sheeran puts it, and I paraphrase, “It helps to clear the wastewater from the faucet.”
That said, here are some tips for writing better headlines:
- Use “power words” – Words like “remarkable” and “noteworthy” help trigger an emotional response. Sprinkling one or two can make your headlines more compelling.
- Add parentheses – Parentheses strengthen your title tag by adding the “icing on the cake.”
Even if you’re not blogging with SEO in mind, you’ll want search engines like Google to find your post and rank it. After all, Googling is still one of the major ways people discover new content to read online.
It’s a good idea to follow simple SEO best practices for every blog post you’re publishing. At the basic level, you should:
- Include the topic in the title – You’ve probably naturally included this while you were brainstorming your headlines. After all, if you’re writing about intermittent fasting, it’s difficult to not mention it. Don’t worry if you haven’t, though; a close variation works too.
- Write a compelling meta description – This is not a Google ranking factor, but it helps to “sell” your article in the search results.
- Use short, descriptive URLs – This type of URLs makes it easy for searchers to understand what your post is about. The simplest way is to make the slug your topic.
- Add alt text to your images – Google uses alt text to understand images. Create a concise but accurate one for every image you use.
- Link to internal and external resources – Cite other people where relevant. It’s also helpful for readers who want to learn more.
If you’re using a content management system (CMS) like WordPress, installing plugins like Yoast or RankMath can make doing all of this a cinch.
Recommended reading: On-Page SEO: The Beginner’s Guide
You’re finally ready to publish your post!
Upload your post into your CMS. Or if you’re using WordPress and have some budget, consider using Wordable. This allows you to do a one-click upload from Google Docs into WordPress. Really easy.
Then give it another quick look to make sure all’s looking good. Finally, hit “publish”!

It’s the truth—blogging is extremely competitive today. Your content, no matter how good, will not be discovered by itself. You need to go out and let people know it exists.
Consider using some of these tactics to promote your content:
- Share it with your audience – You may think you don’t have an “audience,” especially if you’re just starting out. But you have friends, family, colleagues, and followers on existing social media accounts. Share it with them! They’ll be your biggest supporters. Then, over time, as you build up your audience (e.g., an email list), you can share your articles with them too.
- Email people you mentioned in your content – Find the emails of those people you’ve cited or linked to and reach out to them. They’ll be happy to know they’ve been featured.
- Share your content in relevant communities – Facebook groups, Slack communities, Discord, Reddit, and forums—if you are a member of any communities, you can consider sharing your content there. But remember, don’t spam!
Recommended reading: 13 Content Promotion Tactics to Get More Eyeballs on Your Content
Final thoughts
Hopefully, this post has shown you writing a blog post that people want to read is not a difficult process. You can do it too.
Now, go on and get started—that blog post isn’t going to write itself.
Any questions or comments? Let me know on Twitter.


